시배's Android
Compose Docs | ConstraintLayout 본문
Compose의 ConstraintLayout | Jetpack Compose | Android Developers
Compose의 ConstraintLayout 컬렉션을 사용해 정리하기 내 환경설정을 기준으로 콘텐츠를 저장하고 분류하세요. ConstraintLayout은 화면에 다른 컴포저블을 기준으로 컴포저블을 배치할 수 있는 레이아웃
developer.android.com
ConstraintLayout은 화면의 다른 컴포저블을 기준으로 컴포저블을 배치할 수 있는 레이아웃입니다. 여러 개의 중첩된 Row, Column, Box 및 기타 사용자 정의 레이아웃 요소를 사용하는 대신 사용할 수 있습니다. ConstraintLayout은 더 복잡한 정렬 요구 사항이 있는 더 큰 레이아웃을 구현할 때 유용합니다.
다음 시나리오에서 ConstraintLayout 사용을 고려해 보세요:
- 코드의 가독성을 높이기 위해 화면에서 요소를 배치할 때 여러 열과 행을 중첩하지 않으려는 경우.
- 다른 컴포저블을 기준으로 컴포저블을 배치하거나 guidelines, barriers 또는 chains을 기준으로 컴포저블을 배치하려는 경우.
뷰 시스템에서는 중첩된 뷰보다 평평한 뷰 계층 구조가 성능에 더 좋기 때문에 크고 복잡한 레이아웃을 만들 때 ConstraintLayout이 권장되는 방식이었습니다. 그러나 깊은 레이아웃 계층 구조를 효율적으로 처리할 수 있는 Compose에서는 이러한 문제가 발생하지 않습니다.
Get Started with ConstraintLayout
컴포즈의 컨스트레인트 레이아웃은 DSL을 사용하여 다음과 같은 방식으로 작동합니다:
- createRefs() 또는 createRefFor()를 사용하여 ConstraintLayout의 각 컴포저블에 대한 레퍼런스를 생성합니다.
- Constraints은 참조를 매개변수로 받아 본문 람다에서 해당 constraints을 지정할 수 있는 constrainAs() 수정자를 사용하여 제공됩니다.
- Constraints은 linkTo() 또는 기타 유용한 메서드를 사용하여 지정할 수 있습니다.
- parent는 ConstraintLayout 컴포저블 자체에 대한 제약 조건을 지정하는 데 사용할 수 있는 기존 참조입니다.
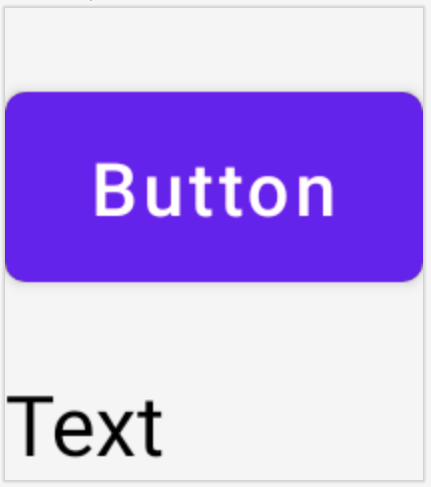
다음은 컨스트레인트 레이아웃을 사용하는 컴포저블의 예시입니다:
@Composable
fun ConstraintLayoutContent() {
    ConstraintLayout {
        // Create references for the composables to constrain
        val (button, text) = createRefs()

        Button(
            onClick = { /* Do something */ },
            // Assign reference "button" to the Button composable
            // and constrain it to the top of the ConstraintLayout
            modifier = Modifier.constrainAs(button) {
                top.linkTo(parent.top, margin = 16.dp)
            }
        ) {
            Text("Button")
        }

        // Assign reference "text" to the Text composable
        // and constrain it to the bottom of the Button composable
        Text(
            "Text",
            Modifier.constrainAs(text) {
                top.linkTo(button.bottom, margin = 16.dp)
            }
        )
    }
}
이 코드는 버튼의 상단을 부모에 16.dp의 여백으로 제한하고 텍스트도 버튼의 하단에 16.dp의 여백으로 제한합니다.

Decoupled API
ConstraintLayout 예제에서 제약 조건은 인라인으로 지정되며, 제약 조건이 적용되는 컴포저블에 수정자가 지정됩니다. 그러나 제약 조건이 적용되는 레이아웃에서 제약 조건을 분리하는 것이 더 바람직한 경우가 있습니다. 예를 들어 화면 구성에 따라 제약 조건을 변경하거나 두 제약 조건 세트 간에 애니메이션을 적용하려는 경우가 있습니다.
이러한 경우 다른 방식으로 ConstraintLayout을 사용할 수 있습니다:
ConstraintLayout에 파라미터로 ConstraintSet을 전달합니다.
레이아웃Id 수정자를 사용하여 컨스트레인트 세트에서 생성된 레퍼런스를 컴포저블에 할당합니다.
@Composable
fun DecoupledConstraintLayout() {
    BoxWithConstraints {
        val constraints = if (minWidth < 600.dp) {
            decoupledConstraints(margin = 16.dp) // Portrait constraints
        } else {
            decoupledConstraints(margin = 32.dp) // Landscape constraints
        }

        ConstraintLayout(constraints) {
            Button(
                onClick = { /* Do something */ },
                modifier = Modifier.layoutId("button")
            ) {
                Text("Button")
            }

            Text("Text", Modifier.layoutId("text"))
        }
    }
}

private fun decoupledConstraints(margin: Dp): ConstraintSet {
    return ConstraintSet {
        val button = createRefFor("button")
        val text = createRefFor("text")

        constrain(button) {
            top.linkTo(parent.top, margin = margin)
        }
        constrain(text) {
            top.linkTo(button.bottom, margin)
        }
    }
}
ConstraintLayout Concepts
컨스트레인트 레이아웃에는 컴포저블 내부에 요소를 배치하는 데 도움이 되는 가이드라인, 배리어, 체인 등의 개념이 포함되어 있습니다.
Guidlines
가이드라인은 레이아웃을 디자인할 때 사용하는 작은 시각적 도우미입니다. 컴포저블은 가이드라인으로 제한할 수 있습니다. 가이드라인은 부모 컴포저블 내에서 특정 dp 또는 비율로 요소를 배치하는 데 유용합니다.
가이드라인에는 수직과 수평의 두 가지 종류가 있습니다. 가로 가이드라인은 상단과 하단, 세로 가이드라인은 시작과 끝입니다.
ConstraintLayout {
    // Create guideline from the start of the parent at 10% the width of the Composable
    val startGuideline = createGuidelineFromStart(0.1f)
    // Create guideline from the end of the parent at 10% the width of the Composable
    val endGuideline = createGuidelineFromEnd(0.1f)
    //  Create guideline from 16 dp from the top of the parent
    val topGuideline = createGuidelineFromTop(16.dp)
    //  Create guideline from 16 dp from the bottom of the parent
    val bottomGuideline = createGuidelineFromBottom(16.dp)
}
가이드라인을 만들려면 필요한 가이드라인 유형과 함께 createGuidelineFrom*을 사용합니다. 그러면 Modifier.constrainAs() 블록에서 사용할 수 있는 참조가 생성됩니다.
Barriers
배리어는 여러 컴포저블을 참조하여 지정된 면의 가장 극단적인 위젯을 기반으로 가상 가이드라인을 생성합니다.
배리어를 생성하려면 createTopBarrier()(또는: createBottomBarrier(), createEndBarrier(), createStartBarrier())를 사용하고 배리어를 구성할 참조를 제공하세요.
ConstraintLayout {
    val constraintSet = ConstraintSet {
        val button = createRefFor("button")
        val text = createRefFor("text")

        val topBarrier = createTopBarrier(button, text)
    }
}
Chains
체인은 단일 축(가로 또는 세로)에서 그룹과 같은 동작을 제공합니다. 다른 축은 독립적으로 제약할 수 있습니다.
체인을 생성하려면 createVerticalChain 또는 createHorizontalChain을 사용합니다:
ConstraintLayout {
    val constraintSet = ConstraintSet {
        val button = createRefFor("button")
        val text = createRefFor("text")

        val verticalChain = createVerticalChain(button, text, chainStyle = ChainStyle.Spread)
        val horizontalChain = createHorizontalChain(button, text)
    }
}
그런 다음 체인을 Modifier.constrainAs() 블록에서 사용할 수 있습니다.
체인은 컴포저블을 둘러싼 공간을 어떻게 처리할지 결정하는 다양한 체인스타일로 구성할 수 있습니다:
- ChainStyle.Spread: 첫 번째 컴포저블 앞과 마지막 컴포저블 뒤의 여유 공간을 포함하여 모든 컴포저블에 공간이 균등하게 분배됩니다.
- ChainStyle.SpreadInside: 첫 번째 컴포저블 앞이나 마지막 컴포저블 뒤에 여유 공간 없이 모든 컴포저블에 공간이 균등하게 분배됩니다.
- ChainStyle.Packed: 첫 번째 컴포저블 앞과 마지막 컴포저블 뒤에 공간이 분배되며, 컴포저블은 서로 사이에 공간 없이 함께 패킹됩니다.
'Android > Compose Docs' 카테고리의 다른 글
| Compose Docs | Anatomy of a theme in Compose (0) | 2023.09.16 |
|---|---|
| Compose Docs | Custom Design Systems (0) | 2023.09.16 |
| Compose Docs | Instrinsic measurements (0) | 2023.09.05 |
| Compose Docs | Alignment lines (0) | 2023.09.03 |
| Compose Docs | Build adaptive layouts (0) | 2023.08.28 |


